The Way The Bunny Hops | Easter Bunny Song | Easter Songs for Kids

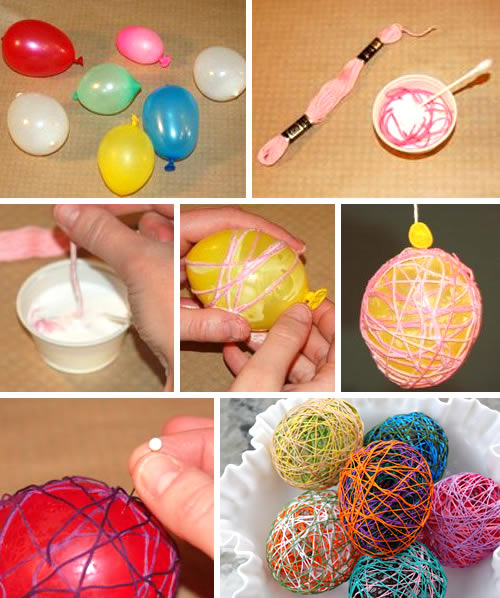
4. Mix your glue with a tiny bit of water if you want. It will make it easier
to soak the yarn, but it will take longer to dry. Either way works – just
don’t dilute it too much.
8.
When you feel it’s
done let it dry. I prefer to let it dry by hanging it from a rack with a
clothes pin. That way it’s not touching anything and won’t get stuck.
9.
When it’s dry
carefully pop the balloon, and fish it out of the egg.

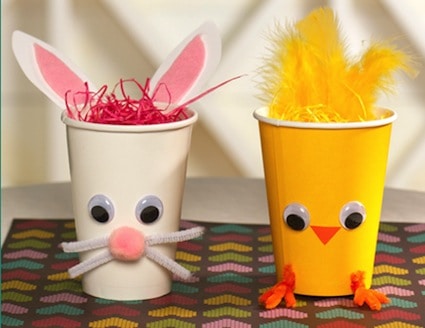

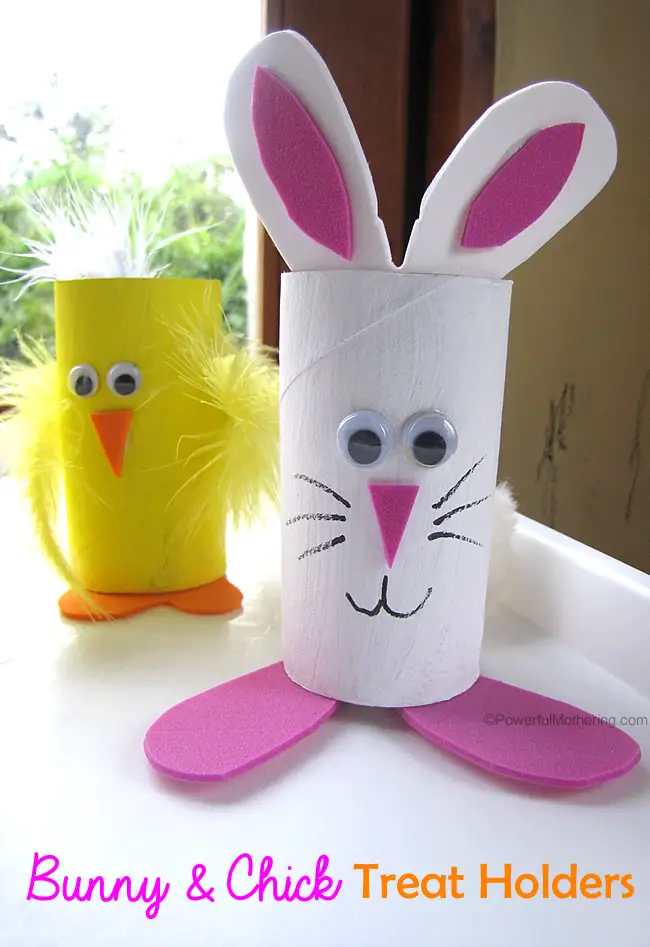
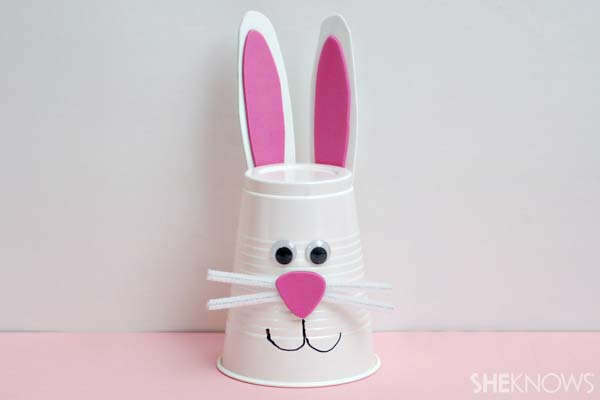


Easter Bunny Treat Holder
Fun way to give some Easter goodies to your friends, classmates, teachers, parents or the Easter bunny.

Craft Supplies:
- Paper or Styrofoam cup
- Construction paper (white and pink)
- Cotton ball
- Pom pom (red or pink)
- Black marker
- Scissors
- Glue
Step #1:
Fold a piece of white paper in half. Cut out bunny ear shapes, but be sure to keep the bottom section of them attached.
Step #2:
Cut out two pink pieces shaped like your ears, just a little bit smaller. Glue these inside the ears.
Step #3:
Using your black marker, draw two large eyes on the cup. Make sure to leave a bit of space below them for your Easter bunny's nose.
Step #4:
Cut the cotton ball in half. Glue each half side by side below your eyes.
Step #5:
Glue your pom pom in the center of the two cotton balls.
Step #6
Glue your ears to the opposite side as your face. Make sure the section that is attached is hidden behind the cup.
Now, just pick out a fun Easter treat and fill it up! Create one for your teacher, parent and all your friends to say Happy Easter!

 Pin It
Simple crafts like this are great story starters to encourage children’s creative writing skills. They provide a very useful springboard to help children launch themselves into a story. For instance, “Here is the story of the chicken who laid the chocolate egg…”
Enjoy making this TP Roll spring chicken, a story starter craft that is sure to spark some creative story writing in your home this holiday!
Materials:
- toilet paper rolls or paper towel tubes
- cereal box cardboard
- googly eye
- yellow paint for the body and wings
- red and orange paint for the beak, comb and wattle (you can color the cereal box pieces with markers if you don’t have red or orange paint or if you want to avoid drying time)
- glue gun
- Cut the triangular wing and tail pieces, heart shape wattle, triangular beak and curly comb out of cereal box cardboard.
- Paint or color the toilet paper tube body and wings yellow, the beak orange and the comb and wattle red.
- Glue the wing and tail pieces to the body as shown.
- Glue the comb, beak and wattle into place.
- Finally, glue on a google eye and your chick is ready for some Easter action.

Conejo para guardar huevos de Pascua.
No hay comentarios:
Publicar un comentario